Deploying Angular 8 Universal App to Firebase with CircleCI (Part 1)
This is the first part of a tutorial which will teach you how to Deploy an Angular Universal App to Firebase via CircleCI.
Here's a small introduction of things I mentioned here.
Angular
Angular is a TypeScript based open source web application framework led by the Angular Team at Google.
Angular Universal
Angular Universal is a server side rendering solution for Angular applications for SEO purposes.
Firebase
Firebase is a mobile and web application development platform developed by Firebase Inc in 2011, then acquired by Google in 2014.
CircleCI
CircleCI is a platform which provides continuous integration of code from multiple developers.
Before you start
These are the prerequisites.
- An Editor (VS Code is recommended).
- Download & Install NodeJS.
- Install Angular CLI globally.
- Sign up on Github.
- Install and configure a Github client to run git commands.
- Sign up on CircleCI.
To Install Angular CLI, run the following command
npm i -g @angular/cli
npm i -g @angular/cli
npm stands for node package manager, which is a package manager comes with NodeJS. i is used as a shorthand of install and -g is used to tell npm to install it globally
Now Let’s Start
Step 1 : Create a new Angular App
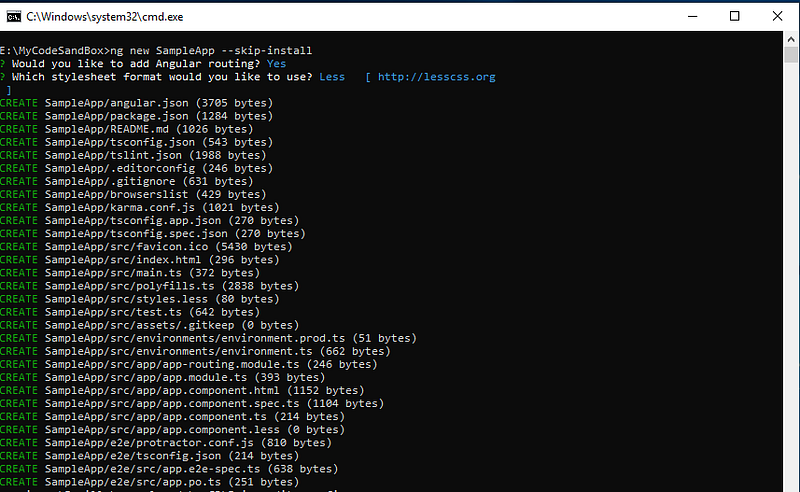
Open Command Prompt and run the following command to create a new Angular Project. It will ask you whether you want to enable routing or not. Select yes (even if you selected no, we can do that later). Also choose the style format you want to use in your project.
ng new SampleApp --skip-install
ng new SampleApp --skip-install
Here, SampleApp is the name of the app we’re creating. And you can see the following output. We are setting the flag --skip-install because we’re using CircleCI to build and deploy our App. So we don’t need to install node_modules locally.
Now navigate to the App Folder and open VS Code in that folder. For that, type
cd SampleApp && code .
cd SampleApp && code .
And it will open Visual Studio Code.
Step 2 : Create a Github Repository
Now go to Github and click on the + symbol on top right corner to create a new repository.
Once created, it’s time to link the repository with our local working directory. Type the following commands in CMD
git init
git remote add origin https://github.com/{username}/SampleApp.git
git init
git remote add origin https://github.com/{username}/SampleApp.git
This will initialise github and set our Github Repository as remote on working directory. You can assign any name to the remote instead of origin.
Step 3 : Create a new Firebase Project
It’s time to add Firebase.
3. Give App Name and a namespace (it will be used to access the app later) and click on Continue
4. Disable Google Analytics in the next screen since we don't want to use it in our project and click on Continue and you will see the below screen.

Step 4 : Add Firebase to Project
It’s time add firebase to our project. For that, first install firebase-tools globally. Run the following command
npm i -g firebase-tools
npm i -g firebase-tools
Now close and reopen CMD and run the following command to log into Firebase.
firebase login
firebase login
This command will open a window in browser and you have to authenticate using Google. Once done, you can start using other firebase commands.

Now navigate to our Project folder and run the following command to initialize firebase.
firebase init
firebase init
This will start initialization process of Firebase and we have to follow few steps here.
1.Select Yes when it prompts whether you want to proceed or not.
2.Next step will ask you which firebase features you want to use in your project. We are using Hosting and Functions (press space to select. Once done, tap enter).
3.In the next step, it’s asking whether you want to create a new Firebase Project or use an existing one. Choose existing one.
4.In next step, choose the app we created in Step 3 from the list. Use arrow keys to navigate and enter to select.
5.The next steps are to configure functions. Use TypeScript as Functions language.
6.Then in the next step, Select yes when it asks you whether you want to use TSLint or not (TSLint is a tool which find out possible errors in TypeScript code).
7.Then it’ll ask you whether you want to install the dependencies or not. Type No because we’re using CI to deploy.
8.Next steps are for hosting configuration. It’ll ask you the hosting directory and the default value is public. Change it to dist/SampleApp. This is where Angular build the app.
9.Select Yes on the next step which will ask you whether you want to configure this as a Single Page app or not.
Now we have successfully added firebase in our Project.
We will discuss about further steps in next post.
We will discuss about further steps in next post.

I really enjoyed reading your blog. It was very well written and easy to understand. Unlike other blogs that I have read which are actually not very good. Thank you so much!
ReplyDeleteHire Dedicated Angular Developer
Such a well-researched post! You made this topic easy to understand, and I enjoyed reading every bit of it.
ReplyDeleteDubai City Tour Packages