Deploying Angular 8 Universal App to Firebase with CircleCI (Part 2)

Step 5 : Register on CircleCI
It’s time to Sign up on CircleCI.
1.Go to circleci.com/dashboard
2.Click Set Up Project on SampleApp.
3.Now Choose Linux as Operating System and Node as Language.
4.Then click on Start Building.
1.Go to circleci.com/dashboard
2.Click Set Up Project on SampleApp.
3.Now Choose Linux as Operating System and Node as Language.
4.Then click on Start Building.
Step 6 : Add Firebase Token to CircleCI
Since we want to deploy to Firebase from CircleCI, we need a Firebase token which will be used by CircleCI to authenticate to Firebase.
Open CMD in our project folder and type the following command
firebase login:ci
Now follow below steps to set the token as an environment variable in CircleCI.
1.Go to circleci.com/dashboard and click on the gear icon in SampleApp.
2.Navigate to Environment Variables tab and click Add Variable.
3.Give name FirebaseToken (can be anything) and place the token in value field.
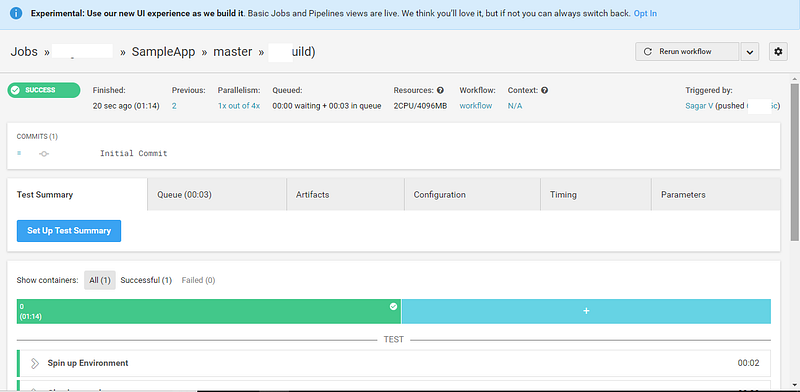
Now Navigate to Circleci.com/dashboard and we can see the job running there.
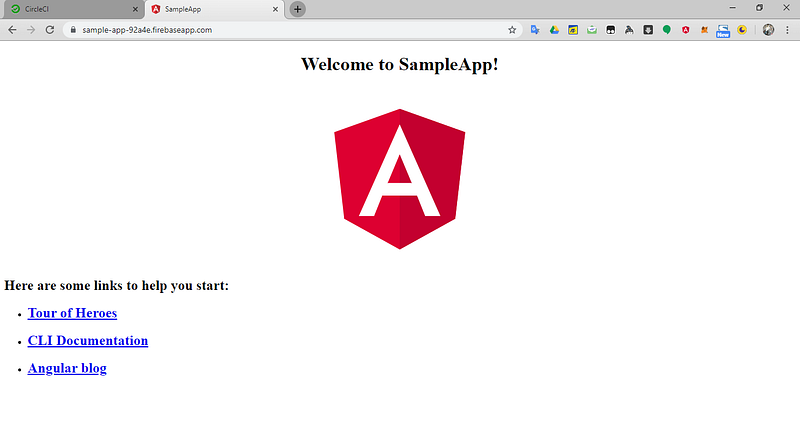
Once finished, we can view our app. Visit <namespace>.firebaseapp.com and you can see our App running there.
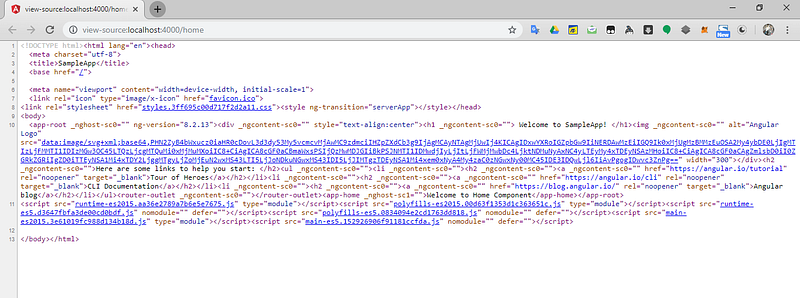
To verify it’s rendering in Server Side, view the source of the App and we can see all the HTML elements and Text content in it.
firebase login:ci
This will open browser and you have to authorize Firebase CLI there again. After you authorize Firebase CLI, you will see a token in CMD. Copy the token.
Now follow below steps to set the token as an environment variable in CircleCI.
1.Go to circleci.com/dashboard and click on the gear icon in SampleApp.
2.Navigate to Environment Variables tab and click Add Variable.
3.Give name FirebaseToken (can be anything) and place the token in value field.
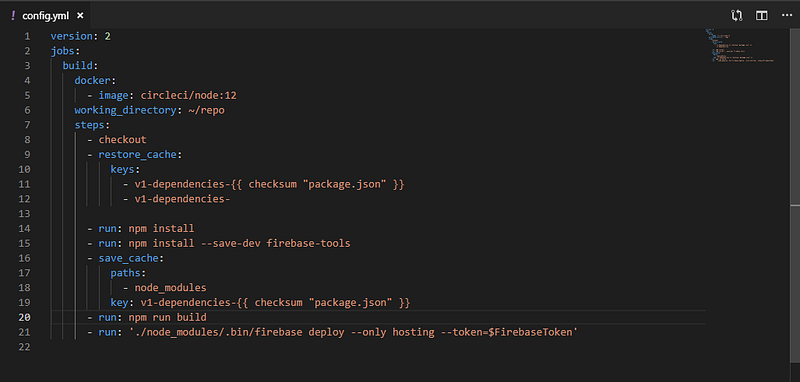
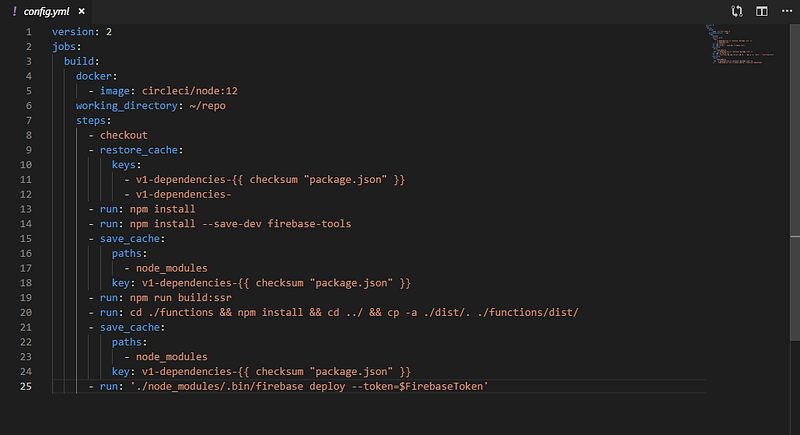
Step 7 : Configuring CircleCI in Project
Adding CircleCI configuration in App.
1.Open our project in VS Code (or any editor).
2.Create a folder with name .circleci
3.Create a file inside it with name config.yml
4.Add the following content to the file
1.Open our project in VS Code (or any editor).
2.Create a folder with name .circleci
3.Create a file inside it with name config.yml
4.Add the following content to the file
Now we need to change the build script in package.json to make AOT build
Change it to
ng build --prod --aot
ng build --prod --aot
Step 8 : Building App
Now let’s push our code to Github and then CircleCI will start building our App.
Type the following in CMD
git add .
git commit -m "Initial Commit"
git push origin master
git add .
git commit -m "Initial Commit"
git push origin master
Now Navigate to Circleci.com/dashboard and we can see the job running there.
Once finished, we can view our app. Visit <namespace>.firebaseapp.com and you can see our App running there.
We’ve successfully created a production build on Angular and hosted it on Firebase. Now what’s the problem?
Angular render all of it’s components via client side rendering. The JavaScript codes will execute in client’s browser and HTML elements will be rendered, once the document is received in client’s end. SEO is a problem here. While Google bot can execute JavaScript, no other crawlers execute it. Hence, Facebook, Bing, Twitter, etc., will treat it as a single html page regardless of the routes.
To overcome this issue, Universal is introduced. Angular Universal, also known as SSR (Server Side Rendering) is a technique to achieve SEO, which will render all native Angular code in Server and serve separate pages for each routes. So that crawlers can understand the pages and parse it’s Title and Meta tags.
Step 9 : Adding Angular Universal to Project
Before adding Universal in our project, we have to install all the dependencies, otherwise we will get an error. To install all dependencies, run the following command
npm i
npm i
This will install all required packages to node_modules, which is required to compile this project locally.
Then run the following command to add Angular Universal in our App.
ng add @nguniversal/express-engine --clientProject SampleApp
ng add @nguniversal/express-engine --clientProject SampleApp
This will create few files and also edit some existing files.

Now let’s see the difference between CSR and SSR. To compile and view, run the following commands
npm run build:ssr && npm run serve:ssr
npm run build:ssr && npm run serve:ssr
This will first build the SSR app and then serve it.
npm run build:ssr will make 2 folders within /dist. browser and server. When visited from a browser, the content from /dist/browser will be served and when a crawler or a non-browser app (eg: curl) visit it, contents from /dist/server will be served.
Once it finished executing, visit http://localhost:4000 in browser and you can see our App in it
To verify it’s rendering in Server Side, view the source of the App and we can see all the HTML elements and Text content in it.
Step 10 : Preparing our Code for Firebase deployment
In order to deploy it to firebase, we have to make few changes.
In server.ts, edit the following line
const app = express();
To
export const app = express();
const app = express();
To
export const app = express();
Because we have to export the express from here and use it in Firebase Cloud Functions.
Now make the following changes in firebase.json
"hosting":{
"public" : "dist/SampleApp"
To
"hosting":{
"public" : "dist/browser"
And
"rewrites":[{
"source" : "**",
"destination" : "index.html"
}]
To
"rewrites":[{
"source" : "**",
"function" : "ssr"
}]
Edit
externals: {
'./dist/server/main' : 'require("./server/main")'
}
To
externals: [{
'./dist/server/main' : './server/main'
},
/^firebase/
]
And then add the following lines to output
library: 'app',
libraryTarget: 'umd'
So output section will become
output: {
path: path.join(__dirname,'dist'),
library: 'app',
libraryTarget: 'umd',
filename: '[name].js'
},
const functions = require('firebase-functions');
const universal = require(`${process.cwd()}/dist/server.js`).app;
exports.ssr = functions.https.onRequest(universal);
"hosting":{
"public" : "dist/SampleApp"
To
"hosting":{
"public" : "dist/browser"
And
"rewrites":[{
"source" : "**",
"destination" : "index.html"
}]
To
"rewrites":[{
"source" : "**",
"function" : "ssr"
}]
Then make the following changes in webpack.config.js
Edit
externals: {
'./dist/server/main' : 'require("./server/main")'
}
To
externals: [{
'./dist/server/main' : './server/main'
},
/^firebase/
]
And then add the following lines to output
library: 'app',
libraryTarget: 'umd'
So output section will become
output: {
path: path.join(__dirname,'dist'),
library: 'app',
libraryTarget: 'umd',
filename: '[name].js'
},
Step 11 : Firebase Cloud Function to Handle SSR
We need to write a Cloud Function to render it in Server Side. Go to functions/src/index.ts and add the following code
const functions = require('firebase-functions');
const universal = require(`${process.cwd()}/dist/server.js`).app;
exports.ssr = functions.https.onRequest(universal);
Here, we are importing the app that we exported from server.ts and use it as a listener in Firebase Function’s https.onRequest event.
Step 12 : Compile the code
Since we made some changes, we have to compile the code again before deploying to firebase. Run the following command
npm run build:ssr
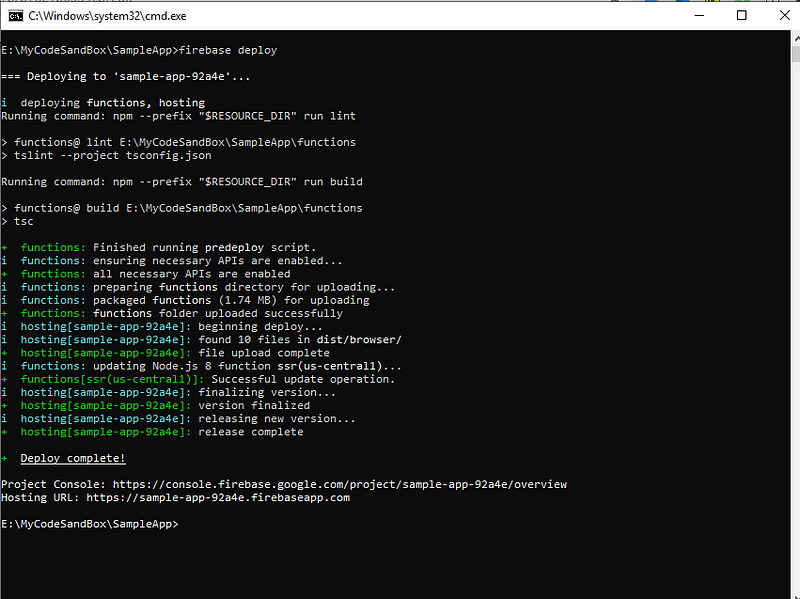
firebase deploy
npm run build:ssr
This will compile the new code.
Now copy /dist to /functions/dist (copy, not move).
Step 13 : Deploying to Firebase
Now it’s time to deploy it to firebase. Run the following command to deploy our code.
firebase deploy
And it will deploy our App to Firebase.
Then visit https://<project-id>.firebaseapp.com to see our app. To confirm SSR, view source code of it.
Step 14 : Using CircleCI
It’s time change CircleCI configuration to build and deploy Angular SSR. Change .circleci/config.yml to the following
Now push it to github
git add .
git commit -m "Added Universal"
git push origin master
git add .
git commit -m "Added Universal"
git push origin master
Visit circleci.com/dashboard to check the status of the build. Once it succeeded, visit https://<project-id>.firebaseapp.com to view our App. To verify Server Side Rendering, Use view source in browser.


Comments
Post a Comment